Driver side window motor

White Lincoln

2nd Gear Poster
Joined
Oct 2, 2023
Messages
114
Location
southwest
Vehicle Details
1994 Mercury Cougar XR7 all stock
Country flag
Hey,
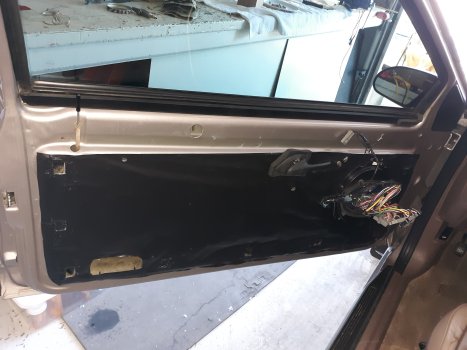
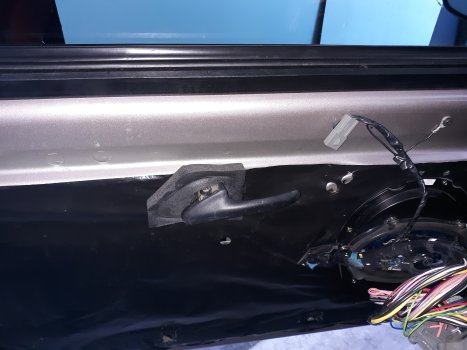
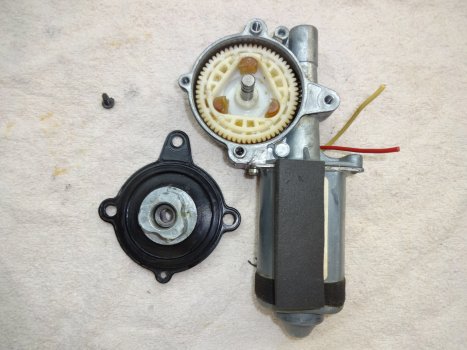
So, I put a new window motor in a while back and ever since then, the window got worse and worse to bring it down. Up is not bad I pulled the motor out and found that the motor I got from RockAuto was never greased inside, just the gear housing. I greased it up and made sure it worked, put it in the window still have about the same issue. I have to wonder if it is either the window regulator or the motor is just crap. You would think going down would be easier than moving the window up.

Before I replace the motor, I was wondering if any one else had this issue and found the problem to be different than just the motor. My manual had little to say about diagnostics for this issue. Oh, and yes, I did regrease the rail joints of the regulator. They are not dry.

Thanks!
 
Hey, as someone who has had both side windows fail in some fashion, it seems like your right, its probably a faulty motor. However, is it just weak? or does it sometimes seem like it skips and doesn't catch? because that's a sign of a broken regulator gear, if that's not it, have you tried spraying silicone spray lube in the side of where the window goes? it can sometimes bind up there. My recommendation if that doesn't work is to pick up a Dorman replacement unit part # 742-250 , I bought one last year and it was working great, although I park my car in the winter and have yet to try it this year. Hope this helps
 
Excellent, thank you Jae 'Bird. The regulator is not slipping and does move up and down without issue, but I will give it another test or two. I will try the silicone, but as you stated, I keep my car in a garage year round and the window is worse in the winter. It got real bad this year though and why I decided i needed to do something. Makes it a pain to go to Sonic... :p
 
Step 1 is getting the old crap out; then you lube the window tracks with white lithium grease; lube all the mechanical pivots with axle grease, and fill the housing with the gear and the three pucks with white lithium grease. The three pucks are 3/8" nylon. There are also felt sliders that could probably use to have new felt on them. Keeping the windows clean helps the sliding action thru the weatherseals.
 
Thanks Grog6 for the info, which is pretty much what I did. I am glad I took the motor out and packed it with grease. I took a lot of window motors out of these cars, but the Mark 7's where the worse for destroying the "pucks". Anyway, everyone I took apart was packed with grease, every part. This motor had nothing on or around the pucks, just the gear for the puck housing (sorry for not using technical terms for the parts).

After I put the motor in, I read some articles on slow windows and most said to use either the NAPA Sil-Glyde or Motorcraft Silicon Lubricant spray. Both are NOT cheap. I started looking into what I had in the garage and found that garage door wheel spray has about the same properties as the two mentioned. After spraying that on the inner tracks, the door window is like new again!

Here is one of the articles I watched:

So, for what it's worth, if your windows are going up and down real slow or having trouble, (especially in cold temps) get some lubricant for window sill's and clean them first if you can with air / vacuum or rag, then spray that stuff in liberally down the glides.
 
I want to share some pics. The door pic is of the garbage bag I used to replace the moisture barrier that was trashed after years of pulling it off and putting it back on. The new black plastic is from a 33 gallon / 1.2 mil garbage bag. I used double stick tape at the top of the door to hold the plastic in while I put down an adhesive around the door. What did I use for an adhesive? Get this, and you may not believe it - Dollar Store stick glue. Rub that all around the edge of the door and around the door panel square sockets and then put the plastic on. Rub the plastic in so the glue holds it. It dries pretty quick and holds really well over time and temp's. The thing that made it easy is to use the old plastic moisture barrier for a template for the new one. I made all the cuts for the square sockets and screw holes, speaker, etc. Enjoy!

I also found these pics I took of the orginal motor I took out before replacing it with this one.
 

Attachments

  • 20240211_160238.jpg
    20240211_160238.jpg
    1.2 MB · Views: 10
  • 20240211_160249.jpg
    20240211_160249.jpg
    1.4 MB · Views: 10
  • DSC01829.JPG
    DSC01829.JPG
    4.6 MB · Views: 10
Nice work! I used packing tape around the perimeter of the stock piece since it’s adhesive came unstuck, it never occurred to me to try regular stick glue
 
Nice work! I used packing tape around the perimeter of the stock piece since it’s adhesive came unstuck, it never occurred to me to try regular stick glue
Mine had too many holes and tears to put back on, which a torn plastic defeats the purpose of a moisture barrier. The only thing about the stick glue is, if you use a lot to make sure it holds, when you do take the barrier off, it leaves a thin film that can be scrapped off with a plastic putty knife. It falls off the plastic so the plastic sheet is readily re-usable. I was hoping my method might make it easier for someone else.

As mentioned, when I took the door panel off this time, that plastic barrier was on there solid and showed no signs of any areas that were glued from coming lose. I was quietly surprised.

Thanks all for the feedback, have a good day out there!
 
I also had my door apart yesterday for the window motor. The "gear plugs" had turned into mush inside the gears. I don't know how the window was still somewhat working they were so destroyed. I think I replaced them in the past so it's surprising they went bad again. I have heard of people replacing them with hex nuts instead of the plastic plugs, might do that next time it fails.

Here is a link to the plugs...

 
The ACDELCO kit from RA had the best lube. Using nuts instead of the pucks moves the breakage somewhere else.
 
I also had my door apart yesterday for the window motor. The "gear plugs" had turned into mush inside the gears. I don't know how the window was still somewhat working they were so destroyed. I think I replaced them in the past so it's surprising they went bad again. I have heard of people replacing them with hex nuts instead of the plastic plugs, might do that next time it fails.

Here is a link to the plugs...

I would advice against using anything but the plastic plugs. They are cheap enough and are critical to keep from stripping the gear assembly of the motor gear and gear housing. Just my two cents.
 
I know Bill at SuperCoupe Performance carries the rebuild kit, its a lot cheaper for shipping within the states, I'm in Canada so it cost an arm and a leg for me, https://www.supercoupeperformance.com/window-regulator-repair-kit-492, although completely replacing the motor might be cheaper.
I bought three boxes of the Dorman kit while they were on sale at RockAuto. Only to find out the motor assembly

from RockAuto is NOT for a Cougar / Bird. The whole inside is bigger and much different than the doorman kit, which I am familiar with after replacing them on my Mark VII​

Sorry about the font... I hate copy and paste from search engines... :p
 
Don't buy this kit either it is the wrong one -


I ended up only using the three plastic plugs, the other parts were the wrong size. I thought they were all the same.
 
I have three boxes of these if anyone needs one... :p
Don't buy this kit either it is the wrong one -


I ended up only using the three plastic plugs, the other parts were the wrong size. I thought they were all the same.
 
I have three boxes of these if anyone needs one... :p
At least I wasn't the only one.

I bought the kit because I wanted to replace everything in the motor. I thought maybe I used the wrong grease on it the first time I fixed it, and that caused the plugs to fall apart.

Ended up cleaning it out with brake cleaner, used the plugs and the grease the kit came with.
 
This is the kit with the good lube now...
So this is what I need to get if my window goes up a bit, then stops, then I help it and it goes up a bit, then stops....ad infinitum?

I don't believe I've ever worked inside an MN12 door. Is it difficult to pull one of these things (I'm assuming the motor with the gearbox attached?) and to rebuild it? All I can remember from working on the inside of other doors is that the stampings have sharp burrs on the edge of each opening leading to many painful cuts... I'm not looking forward to that with my now elderly hands...
I would try cleaning the window glides and spraying the lubricant for the glides and then try the window. I have the right rear window on my Town Car doing what yours is doing and it is most likely the regulator. But on the Cougar / Thunderbird, they do not use the same regulator as a Town Car. The door panel is easy to remove, its the moisture barrier that is pain. You want to try and remove it with a putty knife and then create a new moisture barrier from the OEM one. I did a search on Utube and found several articles on removing the door panel and motor. Try typing this in on your browser:

1994 ford thunderbird door window motor removal

Good luck!
 
It's not hard, it's 3 screws, a bunch of grease, and it will be full of shards of broken plastic. Be sure to get all the crap out, and refill it with fresh grease. Clean the gunk out of the tracks, and put fresh grease on them, everything that moves. Check the felt-covered guides; you can buy new felt at walmart, and rubber cement will hold it in place. There's one slide that's on the other side, away from you, and you can't see it, but it still needs to be cleaned and relubed.
These go bad because the tracks get gunked up.
 
Last edited:
So what is the best grease to use? I am sure that I used silicone paste and the Dorman plugs when I redid the drivers side motor. But they fell apart after 8 years or so. Not sure if it was bad plugs or wrong grease? :unsure:
 
When I rebuilt mine I used silicone grease found in the plumbing section of my hardware store, it worked well but the motor itself eventually failed. Not because of the grease but because its a 34 year old motor and was tired, silicone grease is always safe.
 
Dielectric grease is silicone. Axle grease will soften the plastic. Lithium dries out.
 
I wanted to follow up on this post. I felt this was important to those that come across the same issue. I had th same issue happening to my right rear window of the Town Car. After spraying the guides and greasing the slide, the window still had issues going up and would hang in the middle of the process and then finally go all the way up. A week later I went back and tried the window and it still hung some. 2 weeks later I went back and rolled down the window and rolled it up and problem was gone. The window not moves up and down without issue.

If your windows are hanging going up, I would suggest using the guide lubricant and to be cheap on spraying it in the guides. Excess will flow out the drain hole in the bottom of the door housing. Give the glide lubricant time to soak in and I would suspect after time, the window will roll up and down with out issue.

Hope this helps someone down the line.
 

Similar threads

Back
Top