No mistakes, just happy accidents

I'm posting this here, don't judge. :tongue:

Photo 1: degree wheel pointer. Long bolt + clear acrylic piece with line carved into it + nut to position it

Photo 2: printed degree wheel onto sheetmetal. Bolts directly to crank

Photo 3: home made tool to rotate the crank from the keyway, just scrap aluminum bolted together with a hole and keyway slots filed in

Photo 4: piston stop to find TDC. The middle is a gutted spark plug, there is a length of all thread with a rounded end(done with my bench grinder) run through it, a cut down nut to a DD shape on the cylinder end(so it can pass through the hole, and be clamped for tightening) and a regular nut on the other end. The black stuff at the other end is vacuum tube slipped over the threads, so a spark plug socket can pull it out.

Photo 5: dial indicator extension. I needed this to reach the spring retainer. I used 3/16" rod, ground the tip to a point and carefully drilled a hole in the other end, and job welded a thread of the same pitch in it to mate with the dial indicator.

Attachments​

 
Photo 6: dial indicator extension installed

Photo 7: solid lash adjuster. I disassembled and cut the top of a stock lash adjuster shorter, and pressed a 10mm flanged hex nut into it. Then I took a 8mm head bolt and ground it into a ball shape to pivot within the follower, and cut a slot into it for adjustment to zero lash

Photo 8: modified follower. I needed a larger hole for my screwdriver to adjust the lash adjuster.


Cheap, yes, hack, yes, but a very effective degree kit. ;)

Attachments​

 
Heres the 'new' engine in its near final form. I have most of the pieces out of the way to get the bad engine out, all thats left is the exhaust removal and the the PS pump.

When I painted these valve covers I was looking to make them just body color to contrast the black engine bay, so they have a bit more of a pop when the hood is opened. But XR7 brought it to my attention that it looked very similar to how Ford painted their 390s on earlier Thunderbirds


Because of this, I am thinking about making the plenums I have gold to take the spot of the air cleaner. Whats pictured is my 75mm TB and plenum, but given the CV plenum is so much different I will probably run my stock pieces until I feel like working on it again.

Either way, the question is should I paint those gold as well, leave it black, or as in the case of my stock stuff, leave it silver? really swinging towards gold but I dont want it to look like a jewelry box melted inside of my engine bay.
 
Done

Its been a long road, and its still not done. But she finally runs again. Throttle response is great and fuel trims are perfect.

Just some pictures I took.


Attachments​

 
The SC

I have been talking about this SC for the better part of a month now. Waiting on some metal from other cars to fix the body, so in the mean time I started working on it so it will run again.


The m90 doesnt look too bad on the inside, but the gasket surface is all scraped up and the powder coating it peeling off. I was planning on swapping to a gen4 m90 with gen5 rotors from a GTP but decided that, at least at the moment, Im not gonna spend the money on it, want to make sure it runs well first.


Yes its a blurry picture, but what Im holding is the piece of the HB that remained on the crankshaft and caused this whole mess. What I ended up finding was the timing chain, gears, and tensioner was changed not too long ago, theres not even wear on the tensioner. But what I also found was that there were missing bolts in the timing cover, and that caused some massive oil leaks down the front of the engine.


On the list for tomorrow is to extract the bolt thats broken in the crank shaft and put it all back together. Also gonna be painting and cleaning so it looks half way decent.
 
Got the engine almost 100% back together. I was happily surprised with how easy getting the snapped crank bolt out was. Cleaned up some grease and dirt and threw some quick paint over a few things, just using what I have laying around. I didnt want everything silver and I sure as hell didnt want everything red so Im left mostly with this. The engine bay paint needs to be re done but I will wait till I know she will run.

Balancer is waiting on an installation tool, Im getting new bolts for the blower hat, and I need to get all new fluids. After that, shes ready to start.


Attachments​

 
Quick tease on the current state of the SC.


Attachments​

 
Well, after almost exactly 4 months, the SC is back on the road. Here are some pictures I took of it today. The dealer it was sold at 30 years ago had a car show, sadly I missed most of it including registration trying to get the car to run right after a misfire popped up. But a lot of people, including the owner of the dealership and the organizers of the show, really appreciated the car. Yes, the lower driver window trim is missing and I painted over the handles and keypad. I have an overlay for the key pad and like the uniform look, and the trim piece flew off on the way to the show :smile2:


44234

Hello again.


Gonna start using this, since I made it.

A lot has happened. Lets update yall.

After the last post, my 89 SC ended up having engine issues, which caused it to smoke alot and barely run. At the time I wasnt working anymore and couldnt afford to keep messing with it so I parted it out.


44248


Then stored it in a field.

Literally after that had some flooding in the house and that had to get sorted.


44250

By that June of 2019 house was put back together, and I got Mad Mikes 90 SC winter beater. I asked if he had any fuel filler necks because the one in my 96 was leaking. It came up the car was gonna go away, and said I could try using it. Ended up walking away with the entire car.

44254


At his shop we pulled the motor, trans, and interior, and tossed in the explorer 302 I had bought and brought over, the M5R2 trans from my 89, and a set of bucket seats also from the guy I got the motor from.

He then towed it to me, and we had a hell of a time pushing down a side road and into the back yard of an old project house my friend had.
44255


Then I got it to my dads place in Michigan, where I built the bird while he built his hemi swapped XJ

44256


Got the car running, had some fun.

Then in September my Grandfather on my mothers side, the one who gave me my 1996 Bird, was diagnosed with cancer.

As if to rub salt in the wound my child hood dog Samantha had to be put down due to a tumor rupturing her spleen.

About a week later my Grandfather passed away as well.

Within the time frame of them being alive I was planning to move in with my grandparents to help take care of my Grandfather. This included getting rid of a lot of parts, and bring my 89 SC out of the field.

About a month after life spat in my ******* face, walked into a Petsmart and walked out with two senior dogs. They are Alfie and Niki. Niki is now 15 years old, Alfie is now 12. But they act and run like puppies. They were up for adoption for a year and a half. Kinda felt kicked to the ground at the time, and wanted to help something that probably felt the same way.

As the story goes, Niki was abused. Vet says he believes it because both of her front legs were broken at some point in her life.
Alfie was a stray.
44258


By December a good high school friend of mine came back on leave. Took him for a spin in the red car, he decided he needed one of his own, and he bought the 89 off of me and gave me a couple grand to build it it.

We all know how that went.
44259


He got his money back.

Started posting more while building, ended up selling parts, ect. The car was scrapped in mid September of 2020. Later october I started my new job, and now we are here.
I will now be posting updates on future builds. Starting with the garage renovation updates as big progress.

Aufiderzein.
 

Attachments

  • 1695598180329.gif
    1695598180329.gif
    42 bytes · Views: 2
Garage is mostly cleaned out. The long boxes are undershields for the deck, so theyll either go up or have to be stored somewhere else. I dont like wasting food so the fridge will stay until its empty, and the hutch is too heavy to move by myself.

44279


44280


Company that I picked to do my floors might be able to start late this month. If not itll have to get pushed to mid September. Theyll be milling the floor so its smooth, but most importantly, level. You can see from the photo the floor declines towards the drive way. Its not much, but I dont trust lifting a near 2 ton car in the air with a two post on any kinda angle
 
Ran out of ceiling paint. Ill pick more up during the week.

Really liking the color. Is a bit dark with the lights off, but itll hide stains really well.

20210801_163150-jpg.44676
 
44748


Garage is finished being painted. Happy with it. Need to clean it, adjust my lighting, and then just wait till the floor gets done.
 
20210916_184707-jpg.45197

well guys, this is pretty much it. I still have a lot of organizing and other stuff to do, but this is basically the finished product. Hopefully will find a new place for the ladders and siding. And that the boxed power washer will find a home that isnt my engine shelf.

20210917_143414_hdr-jpg.45210


On the engine shelf!
 
20211001_181532_hdr-jpg.45404


Thunderbird 3: docked for repairs.
Tell you what. If there was a car to test my tubular rocker idea on, this is the shitbox for it.

20211002_131412-jpg.45408

20211002_182833-jpg.45409


Hey @CDsDontBurn and @dDUBb, hows this typical Jersey car compare to those Cali ones?
 
Yes, yall will make fun of me.
Yes, this isnt the welder I was planning on but it was VERY affordable and it allows me to learn a lot of techniques.
No, it doesnt weld as good as the miller 252s at work. But its lightyears ahead of anything else at the price range.

Introducing, my MIG205-DS from YesWelder.
I know its a stupid name. Whatever.

20211011_173945_hdr-jpg.45508


Currently set up and Im learning it. Ive only been using it for about an hour or so. Certainly has a curve because it has a lot of settings, including tuneable auto settings.
It also does stick welding and TIG welding.

Since I have a lot of rust repair on Rowdy, Im testing its MIG settings on sheet metal.
20211011_173938_hdr-jpg.45509


This is a piece of scrap I had sitting around. I forget what its from but I believe its 22 or higher gauge. I plan to use 16 gauge when fixing Rowdy so I can figure out how not to burn through on this, Ill be comfortable on thicker.

I got this welder, the wire, consumables, and two Panoramic auto helmets for $512.

Sadly the gas was $330 because I didnt own a bottle but next refills will be $50. Using C25.
 
20211012_110344-jpg.45527


Found out the upper frame rails are bad as well, and I decided Im gonna tackle these first, cause theyre the easiest.
20211012_110357_hdr-jpg.45528


Drilled out the spot welds and separated the shock tower from the rail. Then sliced the fingers to bend them outta the way. Then cut out the rest of the cancer.

20211012_161451-jpg.45529


At the moment I am making the templates. Making the upper first so I can weld the inner plate in easily.

20211012_161458_hdr-jpg.45530


Edit: piece is in.

20211012_165515_hdr-jpg.45538


20211012_165521-jpg.45539
 
20211012_180053-jpg.45540


And there we are. Amazing what proper tools and actual knowledge will do lol. Still got alot of practice to do
 
20211014_145616_hdr-jpg.45559


Inner rocker kick panel is in.

Genuinely makes me happy doing this
 
20211021_180203_hdr-jpg.45675


Bar is in and front/side is basically done. still have to weld in the bottom and outer plate in front. Rear is welded to the outer most plate, but still need to build the torque box around it.

Pay no mind to the gum welds. Blew through a couple times.

Oddly enough I believe I can already tell a difference. The door has a much more solid sound when it closes, the car doesnt creak when I get in it to grab tools or snack boxes (I use them for templates). Who knows. Maybe placebos.
 
20211022_110720_hdr-jpg.45680


Admittedly Im getting a bit bored just fixing rust. So Im taking the time to mock up something else I plan to ad
 
20211022_154259_hdr-jpg.45687


20211022_135943_hdr-jpg.45686


Am I going to sit back and say Im proud with how it looks? No. Theres alot of things I feel can be greatly improved upon. Taking my time being one of them.

But I do think Ill actually be able to save this car and probably more down the line with this kind of system.

Something tells me Ill get to find out.

Onto the next side.

Note: the cabin will not be open to outside air through the rear section. Itll be closed fully.

But thats more body work, Im focusing on structure.
 
Having dug into a couple of them I have a theory on another reason.

The "middle rocker" is two pieces of metal from both the A piller and the quarter panel structure thats sandwiched and spot welded together. Runs the whole length of the rocker.
Problem is that when the car is electro coated theres not enough clearance for the coating to get in between those metals and stick within the hour the body has in the tank.
But over the course of 10-30 years everyday moisture and salt can get there. And it starts.
Guarantee that if some of yall with "solid" cars took a drill bit and a bore scope to your rockers youd be sick.

Thats the most common area Ive noticed it on, besides the areas with foam. But that same rule applies to any pieces. Almost every panel ive dealt with on this car, the 89, and the cougar started rusting where a metal was layered on top of each other and spot welded. Except for the 89s floor pans. They were just gone by the time I got there.
 
20211027_120236-jpg.45778


20211027_145216-jpg.45777


Last side when I did the upper frame I just bent the fingers out of the way, which flattened out the top of the tower and you can tell its been altered. So on this side I cut it off, and welded it back once I was done. Which imo is better because it doesnt look altered.

Edit: getting a hang of the welder finally. What I need to do is switch to .023 wire so I dont have to use so much heat, but for the time being (and given most of the metal Im messing with is between 16g and 1/8"), itll be ok.

20211027_150130_hdr-jpg.45779
 
20211102_165854-jpg.45886


20211102_165851_hdr-jpg.45885

Floors and inner rock (almost) done.

Still have to do that corner. Which Im dreading cause its a very complicated bend to make with normal hand tools.
 

Attachments

  • 1695601729422.gif
    1695601729422.gif
    42 bytes · Views: 1
First new post on this thread.

And it's a Happy-Accident™️.

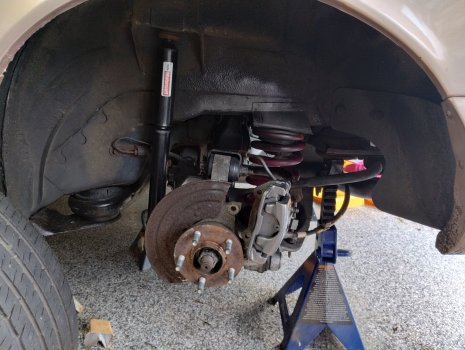
Since around May, I have been under the impression my Cobra Rs are bent. The fronts spun true, the rears wobbled. Crazy that I happened to put both bent wheels on the rear, but finding them to wobble a good 1/4in, I removed them and shelved them.

Fast forward to yesterday, where after I installed my driveshaft I started the car and ran it to see if there was a vibration, incase I clocked the driveshaft wrong.

I noticed at this time both rear wheels were wobbling.

The chances of buying two sets of wheels, both having a pair of bent wheels, and me installing them on the rears AGAIN is not exactly 1/2.

I ripped the wheels off and ran the car again with just the spacers. I noticed that the caliper, rotor, and spacer were all wobbling. At this point I figured the hubs were bent, somehow, and ripped them down. I then ran the car again. Where I found the hubs DID NOT wobble.

Long story short, my COVID era rear rotors were cut in such a way where they are lopsided.

Moral of the story is, new parts doesn't mean good parts. IMG_20230930_172824180_HDR.jpg
 
Heck of a thread!!
Remind me, what happened to the white car that it would up scrapped?
 
Heck of a thread!!
Remind me, what happened to the white car that it would up scrapped?
The A pillars were soft. From where the door hinges were and up.
 

Similar threads

Back
Top